A deep dive into the plugin system of the Shopware 6 Administration
Table of contents
The Shopware 6 administration has some unique capabilities compared to other Vue applications. It allows plugin authors to customize every part of the administration by overriding or extending existing components. This blog post explores the inner workings of the Shopware component pipeline, from registering components and component overrides to the Vue component configuration that is passed into Vue.
Our journey starts at registering a simple Vue component, then we will override and extend the Vue component to showcase the capabilities of the plugin system.
This blog post just glosses over the fact that components are loaded asynchronously on demand, with the introduction of the async-component-library. So everything described here is in reality a bit more complicated.
The protagonists
The Shopware component pipeline consists of three protagonists: the component factory, the template factory and the Vue adapter.
The component factory
The component factory stores all component configurations, resolves overrides and produces the ready to use component configurations.
It stores component configurations in a Map with the following data structure:
interface ComponentConfig<V extends Vue = Vue> extends ComponentOptions<V> {
	functional?: boolean,
	extends?: ComponentConfig<V> | string,
	_isOverride?: boolean,
}
The ComponentConfig type is largely just the default ComponentOptions type from Vue with a bit of special sauce on top, necessary to resolve the overrides and extensions.
The journey of every component, override, and component extension starts here.
The template factory
The template factory receives the templates from the component factory, keeps track of the overrides and extensions, and then renders the final component templates with Twig.js.
It stores template configurations in a Map with the following data structure:
interface Template {
	name: string,
	raw: string,
	extend: string,
	overrides: {
    	index: number
    	raw: string
	}[],
}
The Vue adapter
The Vue Adapter bridges the gap from the component factory to the Vue instance.
It triggers the compilation of all component templates, gathers all component configurations and converts them to Vue asynchronous components.
The Fizz Buzz example
Now on to an example. First, we will register a simple counter component. Then we will override it to this component with a decrement button. Finally, we will extend the counter print Fizz if the count is even and Buzz if the count is divisible by 3.
Registering the basic counter
First off, let’s create a template to be used for our basic counter:
base-counter-template.html.twig{% block counter_container %}
<div>
	<div>Count: {{ count }}</div>

	<div>
    	{% block counter_controls %}

    	{% block increment_button %}
    	<button @click="increment">
        	Increment
    	</button>
    	{% endblock %}

    	{% endblock %}
	</div>
</div>
{% endblock %}
Now we will add some TypeScript to register the component and make it interactive:
base-counter-component.tsimport template from './base-counter-template.html.twig';

Shopware.Component.register('counter', {
	template,

	data() {
    	return {
        	count: 0,
    	};
	},

	methods: {
    	increment() {
        	this.count += 1;
        	return this.count
    	},
	},
});
You need to also import this TypeScript file somewhere and use the component in an existing template, either by extending a component or simply editing an existing template directly.
Now that we have added our base component, we will look at what does it do under the hood.

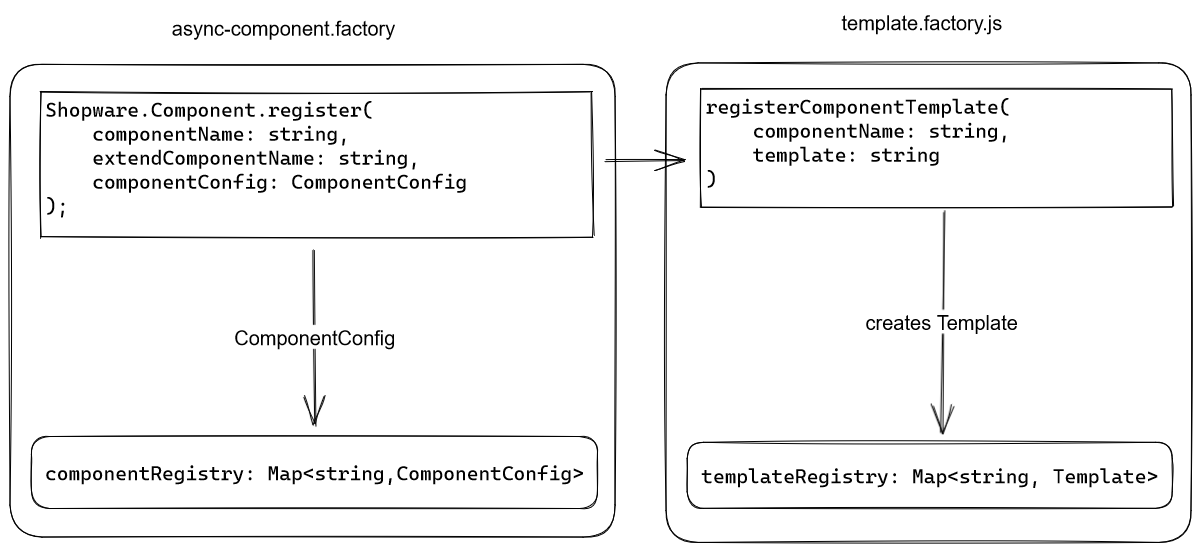
Shopware.Component.register() checks in the map whether a component with the same name already exists and throws an error if so.
Then it extracts the template from the template key in the component config and hands it over to the template factory with the registerComponentTemplate function. This then creates the following entry in the template registry:
const templateConfig: Template = {
	name: 'counter',
	raw: '<stringified twig template>',
	extend: null,
	overrides: [],
}
Finally, the template property is deleted from the component config and the rest of the component config is then added to the componentRegistry
Overriding components
Now we will override the counter_controls twig block and add a decrement button:
counter-override.html.twig{% block counter_controls %}
{% parent() %}

<button @click="decrement">Decrement</button>
{% endblock %}
We will then register our template override and add a decrement method:
counter-override.jsimport template from './counter-override-template.html.twig';

Shopware.Component.override('counter', {
	template,

	methods: {
    	decrement() {
        	this.count -= 1;
    	},
	},
});
The file extension .js here is not a mistake. TypeScript doesn’t know about the ComponentConfig type of the counter component we are overriding and would then throw a bunch of errors. Well, and it kind of can’t, because our override could be one in a chain of overrides. So the ComponentConfig type partially depends on where it is in the override chain and how those previous overrides potentially change the component config we then our override on.
We could write a clever TypeScript type to resolve the ComponentConfig if we knew our location in the override chain, but sadly we can’t because it depends on several factors like the order in which the Shopware.Component.override() function is called.

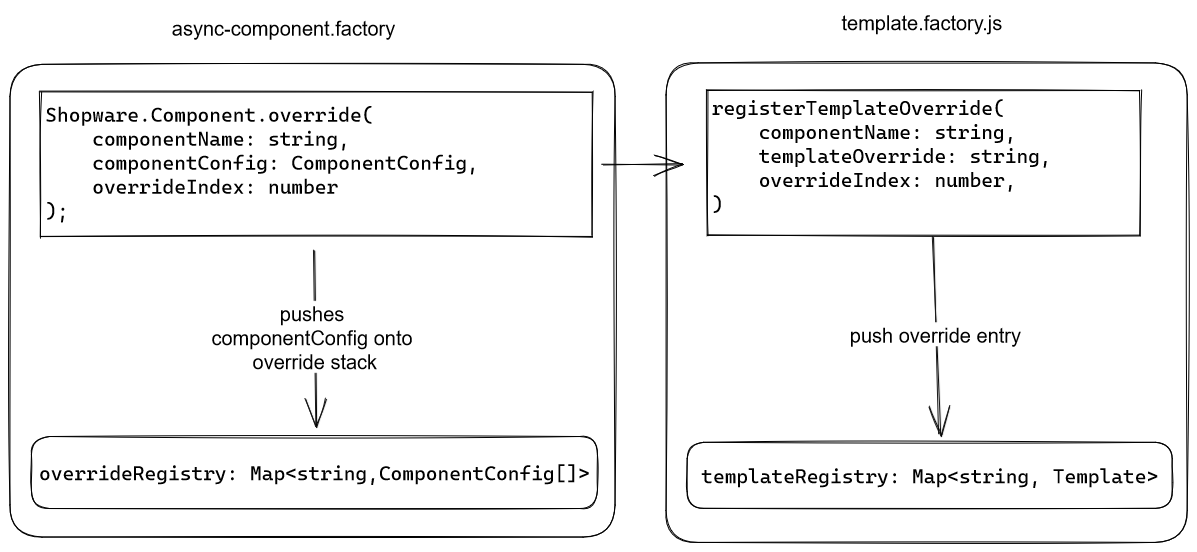
Shopware.Component.override() first tries to find existing overrides for the given component to push the componentConfig into the override stack. If it does not find a matching entry in the overrideRegistry then it creates one and initializes it with an array consisting of the componentConfig.
Then it calls registerOverride, which then either creates a new Template object if none exists with:
const template: Template = {
	name: 'counter',
	raw: '',
	extend: null,
	overrides: [{
    	raw: '<override template string>',
    	index: null
	}],
}
Otherwise, it pushes { raw: '<override template string>', index: null} to the end of the overrides array.
It creates new entries in the templateRegistry, because the base template could be added later than the override template.
Extending the components
Now on to our last showcase of the plugin system. Extending components works a little differently from adding overrides: Instead of modifying existing components, it copies the configuration including the template to a new entry in the component registry and then puts our component configuration on top.
Let’s illustrate this, by displaying Fizz Buzz based on the counter data property. Here is the template:
fizz-buzz-template.html.twig{% block counter_container_inner %}
<div>
	{% parent() %}
	{{ fizzBuzz }}
</div>
{% endblock %}
And the corresponding script that registers the override:
fizz-buzz.jsimport template from './fizz-buzz-template.html.twig';

Shopware.Component.extend('fizz-buzz', 'counter', {
	template,

	computed: {
    	fizzBuzz() {
        	const i = this.count;
        	let result = '';

        	if (i % 3 === 0) {
            	result += 'Fizz';
        	}

        	if (i % 5 === 0) {
            	result += 'Buzz';
        	}

        	if (result === '') {
            	result = i.toString();
        	}

        	return result;
    	},
	},
});
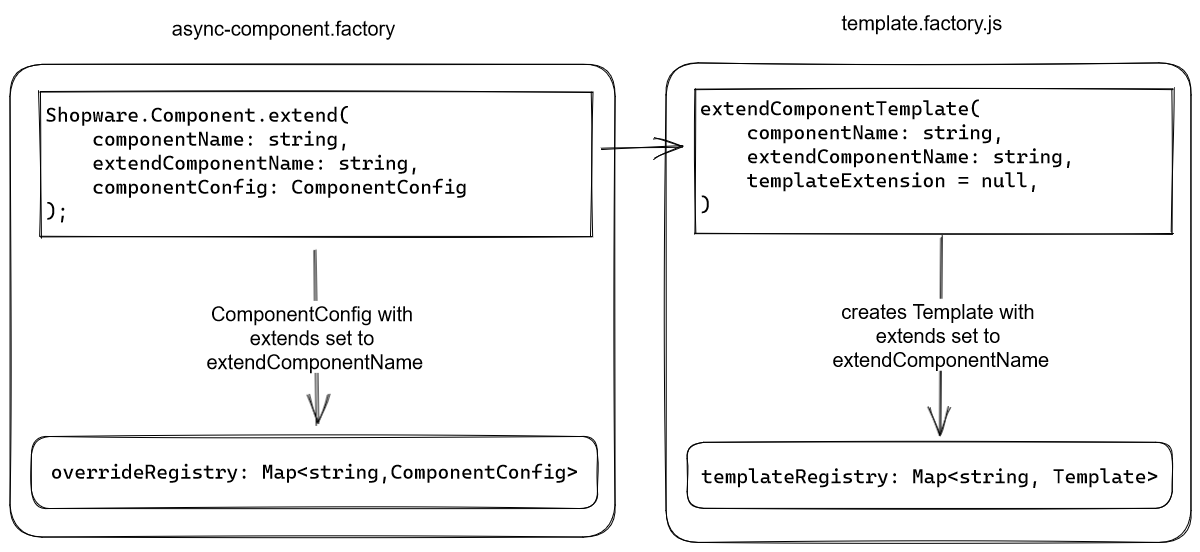
This results in the following data flow:

As mentioned before, component extensions create a new entry in the component library with a reference to the base component. This then look something like:
const componentConfig: ComponentConfig {
	...componentConfig, // the passed in component config without the template
	functional: false,
	extends: 'counter',
	_isOverride: false,
}
Then it adds the following entry to the template repository:
const template: Template {
	name: 'fizz-buzz',
	raw: '<stringifyed twig template>',
	extend: '',
	overrides: [],
}
The new component configuration resolves the overrides first if there were overrides applied to it, and then it gets layered on top of the resolved base component configuration.
The virtual call stack
In the examples before, we were just adding methods without overriding existing methods, but what happens if we were to do so?
The Administration then builds a virtual call stack allowing us, to intervene before and after the next function in the call stack is called. It builds a call stack, by iterating over all the overrides, starting with the override that was added last and ending with the base component. The override that was added last gets the base method name, and every following override gets a hashtag added to the front of the method name. This leads to the last override being called first and the base method being called last.
Each override needs to call this.$super('< method-name> ') once to call the next method in the chain. $super() also returns the return value of the next method in the chain.
Let’s see virtual call stack in action with the following example:
Shopware.Component.override('counter', {
	template,

	methods: {
    	increment(argument) {
        	console.log('argument', argument);
        	console.log('start of override 1');
        	const returnValue = this.$super('increment');
        	console.log('return value of base function', returnValue);
        	console.log('end of override 1');
        	return returnValue;
    	},
    	decrement() {
        	this.count -= 1;
    	},
	},
});

Shopware.Component.override('counter', {
	methods: {
    	increment() {
        	console.log('start of override 2');
        	const returnValue = this.$super('increment', 'This will be passed to override 1');
        	console.log('end of override 2');
        	return returnValue;
    	},
	},
});
Those two overrides would produce the following virtual call stack:
{
	increment: {
    	'##counter': {
        	parent: null,
        	func: '<function reference>'
    	},
    	'#counter': {
        	parent: '##sw-counter',
        	func: '<function reference>'
    	},
	}
}
The overrides would then log the following output when called:
start of override 2
start of override 1
start of base function
return value of base function 1
end of override 1
end of override 2
The virtual call stack is also created for computed properties in exactly the same way.
Extensions get added to the beginning of the call stack. Let’s change the example we used to illustrate the extend feature to also override a method:
Shopware.Component.extend('fizz-buzz', 'counter', {
	template,

	computed: {
    	fizzBuzz() {
        	const i = this.count;
        	let result = '';

        	if (i % 3 === 0) {
            	result += 'Fizz';
        	}

        	if (i % 5 === 0) {
            	result += 'Buzz';
        	}

        	if (result === '') {
            	result = i.toString();
        	}

        	return result;
    	},
	},

	methods: {
    	increment() {
        	console.log('start of extension');
        	this.$super('increment');
        	console.log('end of extension');
    	},
	},
});
This would then log the following:
start of extension
start of override 2
start of override 1
start of base function
return value of base function 1
end of override 1
end of override 2
end of extension
The limitations of the virtual call stack
The virtual call stack works great as long as $super() is being called synchronously. It however breaks down completely if $super() is called asynchronously.
To illustrate this, let’s look at an example by modifying the last override in the chapter about the virtual call stack:
Shopware.Component.override('counter', {
	methods: {
    	increment() {
        	console.log('start of override 2');
        	return new Promise((resolve) => {
            	setTimeout(() => {
                	console.log('end of override 2');
                	resolve(this.$super('increment'));
            	}, 1000);
        	});
    	},
	},
});
So the only thing that has changed is that we are now returning a Promise and then calling $super() after a one-second delay.
If we look at the output, we can quickly see that it ends up in an infinite loop:
start of extension
start of override 2
end of extension
start of override 2
end of override 2
start of override 2
end of override 2
start of override 2
<...>
To figure out what happens here, we will have to look at the source code for the $super function:
async-component.factory.ts$super(this: SuperBehavior, name, ...args) {
	this._initVirtualCallStack(name);

	const superStack = this._findInSuperRegister(name);

	const superFuncObject = superStack[this._virtualCallStack[name]];

	this._virtualCallStack[name] = superFuncObject.parent;

	const result = superFuncObject.func.bind(this)(...args);

	// reset the virtual call-stack
	if (superFuncObject.parent) {
    	this._virtualCallStack[name] = this._inheritedFrom();
	}

	return result;
},
You might have already spotted the culprit: The result ofsuperFuncObject.func.bind(this)(...args) is not awaited, and the call chain is continuously restarted.
We can prevent this by looping our asynchronous override through a synchronous function, like this:
Shopware.Component.override('counter', {
	data() {
    	return {
        	asyncTaskIsComplete: false,
    	};
	},

	methods: {
    	async doSomething() {
        	await new Promise((resolve) => {
            	setTimeout(() => {
                	resolve();
            	}, 1000);
        	});

        	this.asyncTaskIsComplete = true;
        	this.increment();
    	},

    	increment() {
        	if (this.asyncTaskIsComplete) {
            	this.asyncTaskIsComplete = false;
            	this.$super('increment');

            	return;
        	}

        	this.doSomething();
    	},
	},
});
This is a dirty hack, but fixing this in Shopware would break plugins.
The Vue Adapter
Now that we have explored how Vue components get registered in the Shopware administration, we will take a look at the last stop to becoming a real functional Vue components. The Vue adapter is the glue between the component factory, the template factory and Vue.
It instructs the component factory to build the component config for each component based on the previously registered component configs and their overrides. Components created by extending another trigger the build of the component they depend on first, and then they will lay their customizations on top, as described in the previous chapter.
After every component is build, it instructs the template registry to render all the templates with Twig.js. This process happens similarly to building components, first overrides are getting rendered in the order they were added, and then component extensions get rendered on top. This then produces the basic HTML template you know from Vue single file components.
It then passes the complied template and resolved component configuration into Vue to create normal Vue components.
And that is it, the normal Vue components can now be registered to base Vue application like any other Vue component.
Conclusion
I hope this blog posts gave you insights into what Shopware does to allow plugins to customize the administration.
It’s pretty robust and gives plugins authors a lot of leeway. They have the ability to override and customize almost everything in the administration. While being relatively easy to understand with a bit of Vue knowledge.
The only problem this plugin system has for you as a developer is that it is not providing types for the components you are basing your overrides or extensions on. This is because of the previously discussed unpredictability of the order of overrides. The only thing we could do here is to provide types for the base components, but those types could also lie to you when other plugins are installed.
This approach of providing extensibility will probably still work with the Vue 3 Options API with just minor changes, because components in Vue 3 are just plain objects before they get passed into Vue.