1Password SSH Keys in WSL 2
Table of contents
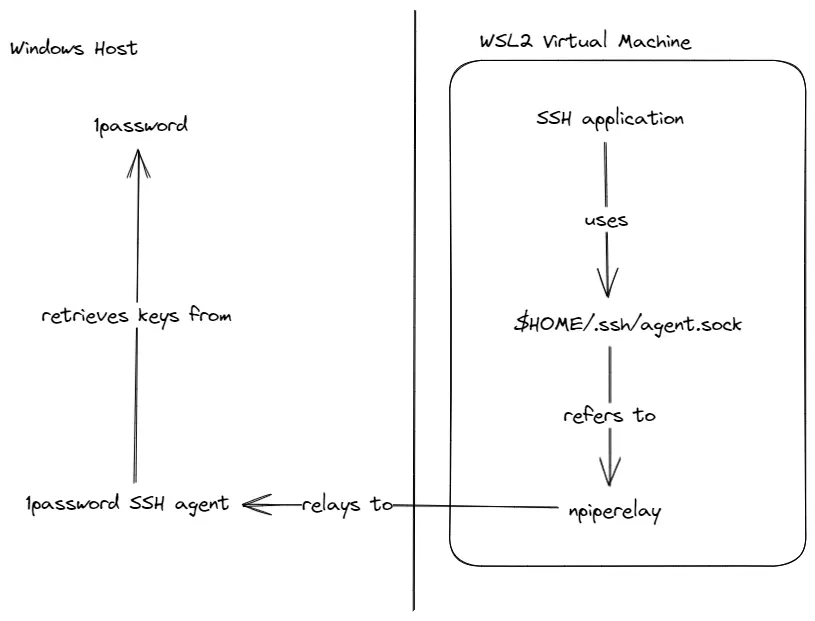
This guide explains how to set up WSL 2 to use SSH keys stored in 1Password to authenticate to ssh servers and to sign git commits.
Parts list
- 1Password the password manger that stores the keys
- 1Password SSH agent for retrieving the keys from 1Password
- npiperelay for accessing Windows named pipes from WSL 2
- socat for exposing the pipe to the SSH key as socket file
- Systemd for managing the tunnel to 1Password on the windows side
Enabling the SSH agent
1password has an SSH agent that we can use to get our SSH keys from the password manager. The SSH agent controls who can use our SSH keys and asks us for permission every time a program wants to use the keys.
The 1password SSH agent is not enabled by default, so we need to enable it manually.

Make sure to enable the “use the SSH agent” checkbox in the Developer category.
Installing npiperelay
Now that the SSH agent has been enabled, we need a program to pipe requests from WSL 2 to it. This is where npiperelay comes in, it allows us to use Windows named pipes from WSL 2 and with that our SSH agent.
To install it, download the latest release from their releases page and put it somewhere safe on the windows side. I put mine in the path C:\Windows\System32\npiperelay.exe, but you can put it everywhere. You just need to be able to build a path from one of the partition mounts under /mnt in WSL 2.
Installing socat
socat will be used to expose our SSH agent through npiperelay to a socket file. socat can be installed in a myriad of ways, but as I’m using Ubuntu as my Linux distribution, I’ll install it with Ubuntu’s package manager apt.
sudo apt install socatSystemd unit
We’ll use systemd to start the tunnel to the 1password SSH agent running on the windows side every time our WSL 2 distribution boots up.
This is the systemd unit I use to manage npiperelay and socat:
~/.config/systemd/user/ssh.service[Unit]
Description=SSH Relay

[Service]
ExecStartPre=/bin/rm -f /home/not-root/.ssh/agent.sock
ExecStart=/usr/bin/socat UNIX-LISTEN:/home/${username}/.ssh/agent.sock,fork EXEC:"/mnt/c/Windows/system32/npiperelay.exe -ei -s //./pipe/openssh-ssh-agent",nofork

[Install]
WantedBy=default.target
The unit deletes the previous socket file if it exists. Then creates a new socket file with socat and finally builds the bridge with npiperelay from the socket file to the SSH agent running on the Windows side.
Make sure to replace ${username} with your UNIX username and to adjust the path to your npiperelay.exe in the EXEC step.
Next enable the unit with:
systemctl --user enable ./ssh.serviceAnd start it with:
systemctl --user start sshWSL 2 got systemd support in fairly recently at the time of writing in late 2022.
Depending on your WSL 2 distribution, you also need to install libpam-systemd manually.
Exposing the SSH Auth Socket
Lastly, we need to add the SSH Auth Socket to our environment variables. I’m using bash, so I’ll add the following to my .bashrc:
export SSH_AUTH_SOCK=$HOME/.ssh/agent.sockTesting the SSH key
You can test authentication with ssh -T [email protected] assuming that you have put your GitHub SSH key into 1Password.
Configuring git to sign commits with ssh
We’ll start by using the default ssh signing config generated by 1Password, and then we’ll bend it to work with our auth socket setup.
I recommend following this guide from 1Password: Sign Git commits with SSH | 1Password Developer to get the basics set up. After following that guide, you should have a .gitconfig kind of like this:
[user]
  signingkey = ssh-ed25519  \
  SIGNING-KEY

[gpg]
  format = ssh

[gpg "ssh"]
  program = "path to op-ssh-sign.exe"

[commit]
  gpgsign = true
The only thing we really need from that .gitconfig is our signing key, that we then plug into our custom config:
~/.gitconfig[user]
  signingkey = ssh-ed25519
  SIGNING-KEY

[gpg]
  format = "ssh"

[commit]
  gpgsign = true

[tag]
  gpgsign = true

[gpg "ssh"]
  allowedSignersFile = /home/${username}/.config/git/allowed_signers
Now you should be prompted to give git ssh access every time you commit something. Go ahead and try it. You can test the signature by running git log --show-signature locally or by pushing the commit to a platform like GitHub that supports signed commits and checking the signature there.